
GCG
Branch-and-Price & Column Generation for Everyone
Branch-and-Price & Column Generation for Everyone

With this getting started, we do not want to explain how to use GCG and its features (this was done in the User's Guide), but rather how GCG is implemented.
After a first introduction to development in general and our guidelines for projects, we proceed to implementational details of GCG. GCG is built on top of SCIP and uses SCIP's methods, data structures and interfaces and thus it is necessary to understand how SCIP and GCG generally do things and secondly, how GCG communicates with SCIP.
In this section we describe how even unexperienced software developers can get themselves up-and-running in no time with GCG to start developing as seemlessly as possible. If you are an experienced developer, you may simply skip to the GCG-Specific Implementational Details.
After installing GCG from Git using the Git Installation Guide, you will probably start changing code. To get started, the following hints might help you (if you are using the Makefile build system).
executed from within the top directory of your installation folder, where deps stands for dependencies. The process takes about 5-10 minutes depending on your system and generates the binaries and/or libraries necessary, e.g. SCIP, SoPlex, etc.
executed from within the top directory of your installation folder and used links to all dependencies. This usually takes about 5-10 minutes depending on your system and generates the GCG binary, which is located in bin/ and the reason why we always call GCG using ./bin/gcg.
src/, i.e. GCG code, you have to recompile GCG using make. This should only recompile the affected files and does not take long (a few seconds).lib/, e.g. SCIP code, you have to recompile the dependencies using make. This should still only recompile the affected files and does not take long.BLISS=true), it is required to do this with both commands, i.e. call make deps BLISS=true and make BLISS=true. Not all flags change things during both compilation runs, but to avoid unnecessary errors, we recommend to have the flags synchronized at all times. Note that some flags (e.g. OPT=dbg) need to recompile all code (since different binaries are generated), while others do not.First, please note that
Therefore, if you are developing with access to the Git of GCG, it is an absolute must to first go through the New Developers Checklist and check out the most important guides in the GCG Manuals and Guides.
After setting up our branch and project page (as specified in the Git Workflow), for many projects, it has proven useful to start with adding
Next, one can start with the development of the feature.
Before starting with development, it might be useful to read the GCG-Specific Implementational Details. Then, we also generally recommend to take a look at the Example Projects, if applicable. During development, please
We recommend to start testing as soon as the code is able to run to avoid consequential errors. If developing on our Git, an automated CI pipeline will compile and briefly test your code upon every push. Once the new feature is ready to be tested more thoroughly, there are different guides for each step of testing. Again, there are also pages in the [GCG Git Wiki]((https://git.or.rwth-aachen.de/gcg/gcg/-/wikis/GCG-Manuals-and-Guides) that have to be followed to make the tests run inside the chair's infrastructure, so keep that in mind.
To conduct experiments, we have a guide on How to conduct experiments with GCG. Testing in general requires an installation with Makefile. After having gathered the files described in What files are generated? please follow the next steps (e.g. A. Comparing Settings or B. Comparing Code), which will use The Visualization Suite and its automatic reporting functionality to allow for easy comparisons.
In general, it should be possible for other researchers to reproduce your results. We recommend to always
In this section, we explain the most important characteristics of SCIP's implementation and the interplay between GCG and SCIP.
Both SCIP and GCG (aim to) comply with a common set of coding style guidelines. Those are given by the SCIP documentation.
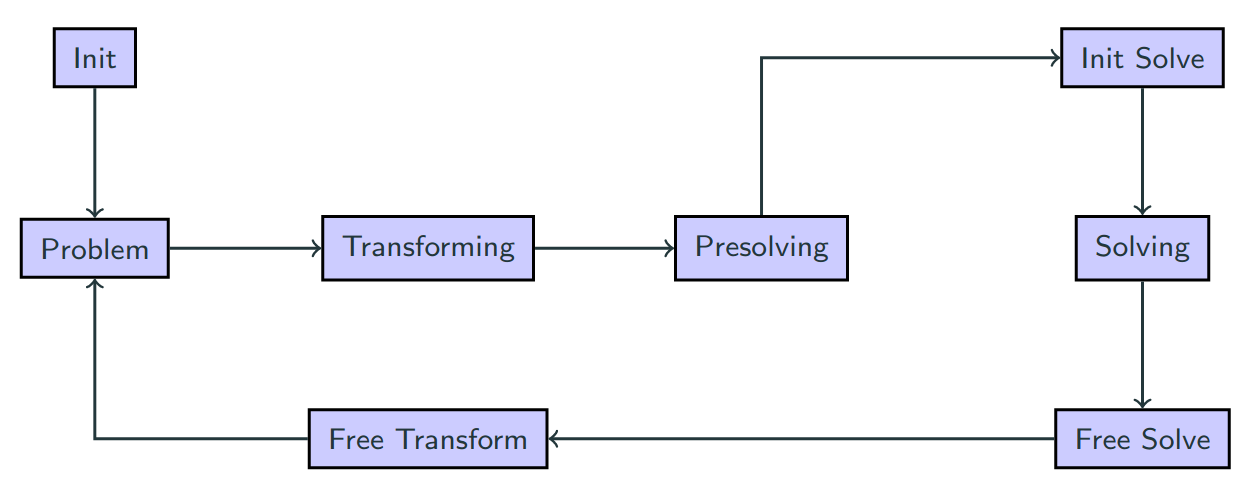
At times, GCG needs to interact with SCIP directly. This can only be done within the limits of the current SCIP stage, because the solving process within SCIP is executed in stages (see Figure 1). For more information, please check the SCIP documentation or the SCIP intro presentation.
During the solving process, GCG manages two SCIP instances, one holding the original problem, the other one representing the reformulated problem.
As you read in your instance, it will be kept in SCIP and GCG as the "original" problem. Everything you do to it after reading in is performed on the "transformed" problem (presolving is applied on the "transformed" one). The original problem is used as a safe copy to check the feasibility of solutions. In particular, it cannot be manipulated. GCG is detecting on the transformed (i.e. also presolved) problem (opt), but can also detect on the original (detect without presolve before it). It is important to know in which problem you are working (usually always the master, i.e. transformed problem), especially for SCIP's memory management. If you want to allocate memory in the master problem, you have to access it "manually". Example:
One of the core features of GCG, the generic column generation, leads to the fact that GCG sometimes wants to branch differently than SCIP wants to. This is why we synchronize the branch-and-bound tree between the underlying SCIP instance and GCG, such that SCIP can execute them.
As teased in the previous section, the original instance coordinates the solving process while the transformed instance builds the tree in the same way, transfering branching decisions and bound changes from the original problem and solving the LP relaxation of the extended formulation via column generation.
The code for the communication to SCIP during branching on original variables is inside the cons_masterbranch.c and cons_origbranch.c source files. The process is as follows: We (since we can make better branching decisions in most cases) branch ourselves (cons_masterbranch) and then mirror those decisions to SCIP (cons_origbranch) where they are reconstructed.
In the case that an aggregation took place, we do not do branching on original variables.
After having read the above information, you might want to start developing. For this purpose, we have prepared multiple "How to add" guides. You can also use the example projects as guidance.
⇨ Example Projects
⇨ How to add
 1.8.17